Eleven rooms, one honest answer to “is anyone in there?”
A DIY presence-sensing layer for the house: one small sensor node per room, each pairing a 24 GHz mmWave radar with a passive-infrared detector and a light sensor, talking to Home Assistant on the DECS Pi over the existing WiFi. No electronics on the person, no cameras, no cloud.
What you get
- Per room: an Occupied sensor that turns on within half a second of someone walking in and stays on while they sit still, read, or sleep. Type A rooms also give live x/y position of up to three people and up to three named zones (bed, sofa, stair head).
- Per node: light level in lux, WiFi signal, uptime, and on the wet-room nodes temperature and humidity.
- Whole house: House occupied, Upstairs / Downstairs occupied, Everyone asleep, and an estimated headcount, all built from the room sensors in Home Assistant.
- Automations ready to paste: lights that follow people and respect daylight, bathroom fans on humidity, a landing night path, heating setback for empty rooms through the Wunda climate entities, and a night-time part-arm of the GlobalGuard alarm with a cancel window.
- A Presence tab for the wall tablet that fits the existing home-panel build.
Design decisions, in one place
| Decision | Choice | Why |
|---|---|---|
| Sensing | mmWave + PIR fused on the node | PIR is instant and never false-positive on fans; radar holds while still. Each covers the other's blind spot. |
| Radar, big rooms | HLK-LD2450 (Type A) | Tracks 3 targets with x/y to ~10 cm, 6 m range, ±60°. Zones let you exclude the curtain and name the bed. |
| Radar, small rooms | HLK-LD2410C (Type B) | Half the price, presence + distance only. Enough for a bathroom, utility or porch. |
| Microcontroller | ESP32-C3 Super Mini | £2, USB-C, native ESPHome. Needs its WiFi power capped (see Troubleshooting) and a decent 5 V supply. |
| Firmware | ESPHome, native API | Same toolchain as the alarm fob bridge already on the Pi. Encrypted, local, auto-discovered, OTA updates. |
| Network | Tenda mesh 2.4 GHz, static IPs 192.168.5.130–140 | Three mesh nodes cover the house better than the single Virgin hub. Same subnet as the alarm ESP, Wunda hub and tablet; HA reaches it via the Pi's wlan0. |
| Power | USB-C 5 V 1 A plug-in adapter per node | No mains work, no electrician, and every node is a two-minute swap. |
| Build | ESPHome dashboard container on the Pi | Eleven nodes deserve a UI. Same image you already run for the fob, just left running on port 6052. |
What it will not do
It will not tell two people apart. Radar cannot identify anyone; the Extras section shows how to add “who” using the phones you already carry. It will not reliably separate a large dog from a person on the Type B nodes. And a node aimed through a 100 mm stud wall will see the next room, so placement and zone filters matter more than any code.
Home Assistant Container on DECS (192.168.0.111, host network, dual-homed onto 192.168.5.x). ESPHome already used for the alarm remote bridge at 192.168.5.109. Wunda heating exposes a climate entity per room. GlobalGuard alarm is a template panel where arm_home is the Sleep part-arm. FastCon bulbs are driven from the esphome-fastcon bridge. The presence layer only adds inputs; nothing existing has to change.
Which node goes where, and what it drives
Seven Type A tracking nodes where position and zones earn their keep, four Type B presence nodes where a yes/no is all anyone needs.
| Room | Node | Sensors | Mount | Zones / notes | Drives | Static IP |
|---|---|---|---|---|---|---|
| Porch | B | LD2410C · PIR · lux · temp/RH | Under the porch ceiling, facing the approach, tilted 20° down | Short range (gate 3, ~2.25 m) so the pavement does not trigger it. Fully enclosed box. | Porch light, “someone at the door” on the Cast displays, door-open-while-empty alert | 192.168.5.130 |
| Hallway | A | LD2450 · PIR · lux | Wall opposite front door, 1.9 m, aimed along the hall | Zone 1 = front door mat (arrivals), zone 2 = foot of stairs. Filter zone on the living-room doorway if the radar bleeds through. | Hall light, arrival scene, night path | 192.168.5.131 |
| Living room | A | LD2450 · PIR · lux | Wall opposite sofa, 1.8–2.0 m, tilt 10° | Zone 1 = sofa, zone 2 = TV chair. Filter zone over the window if curtains move. | Lamps, TV-on ambience, heating setback, “house empty” logic | 192.168.5.132 |
| Kitchen | A | LD2450 · PIR · lux | High corner away from the hob, aimed across the worktops | Filter zone over the extractor hood and any fan. Zone 1 = cooker area (for “cooker still on, nobody here” later). | Kitchen lights, under-cabinet lights, appliance safety alerts | 192.168.5.133 |
| Utility | B | LD2410C · PIR · lux · temp/RH | Wall away from washer/dryer, 1.8 m | Cap max gate so the drum spin does not read as motion; drop still-threshold on far gates. | Light, humidity alert, leak sensor later | 192.168.5.134 |
| Landing | A | LD2450 · PIR · lux | End wall of landing at 1.9 m, looking along it to the stair head | Zone 1 = stair head (fall/still alert), zone 2 = bathroom door approach. | Landing night light, stair safety, upstairs-occupied | 192.168.5.135 |
| Bedroom 1 (Kev) | A | LD2450 · PIR · lux | Wall facing the bed, 1.8 m, tilt 10° | Zone 1 = bed (asleep = still target in zone 1). Filter zone on any fan or radiator with a thermostatic actuator. | Bedside lights, asleep detection, heating setback, TV standby | 192.168.5.136 |
| Bedroom 2 (Linda) | A | LD2450 · PIR · lux | As above | As above | As above | 192.168.5.137 |
| Bedroom 3 | A | LD2450 · PIR · lux | As above | Guest use: zone 1 = bed. Doubles as a study zone if a desk is there. | Lights, guest-present flag, heating setback | 192.168.5.138 |
| Bathroom 1 | B | LD2410C · PIR · lux · temp/RH | Ceiling corner outside the shower zone, 2.2 m | Radar is not fooled by steam; PIR is, so PIR only confirms entry. Humidity drives the fan. | Light, extractor fan, night dim | 192.168.5.139 |
| Bathroom 2 | B | LD2410C · PIR · lux · temp/RH | As above | As above | As above | 192.168.5.140 |
Placement rules that decide whether this works
- Aim at people, not at walls to other rooms. 24 GHz passes through plasterboard. A node facing a stud wall reports the neighbour.
- Height 1.8–2.2 m, tilt 10–20° down. Keeps the beam over furniture and under the ceiling.
- Nothing that moves in the beam. Ceiling fans, oscillating heaters, curtains at an open window, a washing-machine drum, a hanging plant near a radiator. Either move the node or draw a filter zone.
- PIR wants a clear line of sight and no heat sources. Not above a radiator, not facing a window that gets low sun.
- Keep 30 cm from mirrors and large metal (fridge, boiler). They act as radar mirrors and double the room.
How a footstep becomes a light switching on
Every decision happens locally. The node fuses its own sensors and publishes one clean Occupied signal; Home Assistant does the house-level reasoning and drives the things you already own.
Why fuse on the node and not in Home Assistant
A template in HA works, but it depends on the API connection and HA being up. Fusing on the ESP means the Occupied entity is a single binary sensor with one timestamp, HA's history is clean, and a node keeps sensible state through an HA restart. The raw PIR and radar entities are still exposed for tuning and for the state machine drawing above.
Timing design
| Layer | Where | Default | Purpose |
|---|---|---|---|
| Radar presence timeout | LD2450 / LD2410 register | 5 s (LD2450) · 5 s (LD2410) | How long the module keeps reporting a target after the echo fades. Keep short; longer here hides real vacancy. |
| PIR delayed_off | ESPHome filter | 5 s | Smooths the AM312's 2 s pulse train into one event. |
| Occupancy hold | ESPHome template, per room | 30 s hall/landing · 60 s kitchen/bath · 120 s living/bedrooms | The one you will tune. Long enough that a still person is never lost between radar frames. |
| Automation off-delay | HA automation | Lights 2–5 min · heating 45 min · house empty 15 min | Cost of a wrong “off” differs per output, so this is where the differences live. |
Why radar plus PIR, and which radar
Each technology fails in a different way. Picking two with opposite failure modes is cheaper than picking one perfect sensor, because there isn't one.
| Technology | Sees still person | Position | Multi-person | Line of sight | False triggers | Cost | Role here |
|---|---|---|---|---|---|---|---|
| PIR (AM312) | No | Segment only | No | Needed | Radiators, sun, pets | £0.70 | Fast, certain “someone entered” |
| mmWave LD2410C | Yes | Distance only | No | Not needed | Fans, drum, curtains | £3 | Type B hold while still |
| mmWave LD2450 | Yes | x/y ±10 cm | 3 tracks | Not needed | Fans, curtains; zones fix it | £6 | Type A tracking + zones |
| Thermal array MLX90640 | Yes | 32×24 heat map | Yes | Needed | Heat sources | £40 | Not used; porch option in Extras |
| WiFi CSI sensing | Poorly | Room-ish | No | Not needed | Everything that moves | £3 per node | Not used; needs retraining per furniture move |
| CO₂ (SCD40) | Yes | Room | Trend only | Not needed | Open windows | £12 | Extras: bedroom air + corroboration |
Ready-made alternatives, priced for this house
If soldering eleven boards is not your idea of a good Saturday, these exist. Prices are UK retail in September 2026, rounded.
DIY node (this design)
£15 Type A · £13 Type B · ≈ £160 for 11 rooms
LD2450 or LD2410C, PIR, lux, humidity where needed. Full ESPHome control, zones, x/y, no hub. Two evenings of soldering, or one with a friend.
Everything Presence Lite
≈ £35 + £8 case · £470 house
Same LD2450 on an ESP32 with a tuned ESPHome config and a browser zone editor. No PIR, no humidity. The premium buys you a case and no soldering. Good choice if you want two or three rooms done tonight.
Aqara FP2
£80 · £880 house
60 GHz, 30 zones, up to five people, fall detection. Needs 2.4 GHz WiFi and integrates through HomeKit Controller in HA (local). Best product in the category, priced like it.
Sonoff SNZB-06P (Zigbee)
£15 + £35 coordinator · £200 house
5.8 GHz microwave, presence only, minimum 15 s to 2 min timeout, no coordinates. Needs a Zigbee coordinator you don't currently have. Reasonable for bathrooms and the utility if you go Zigbee for other reasons (see Extras).
Tuya “ZY-M100” WiFi radar
£10–12 · £130 house
Works with the tuya-local integration already installed. Presence + distance + lux. No zones, cloud-paired once, occasionally flaky firmware. The cheapest zero-solder route; not the reliable one.
Hybrid (recommended if time-poor)
≈ £230 house
DIY Type A in the four rooms where zones matter (living, three bedrooms), Everything Presence Lite in hall and landing, Tuya radar in the four small rooms. Same HA package works with all three; only entity names differ.
The parts, and the one gotcha on each
| Part | Spec that matters | Gotcha |
|---|---|---|
| HLK-LD2450 | 24 GHz FMCW, 1T2R, 6 m, ±60°, 3 targets, UART 256000 baud, 5 V in / 3.3 V logic, ≤ 200 mA | Firmware must be V2.02.23090617 or newer for the ESPHome component; buy from a listing that says “latest firmware”. Bluetooth is on by default; switch it off after setup to save power and RF noise. |
| HLK-LD2410C | 24 GHz, 6 m, ±60°, 9 distance gates, UART 256000, 5 V in, ≈ 80 mA | The “C” has the light sensor pad and the 1.25 mm connector. LD2410B is the same radar with a different header. Both fine. |
| AM312 mini PIR | 2.7–12 V, 3.3 V push-pull output, ~3 m, 100°, 2 s hold, 60 s warm-up | Clones are noisy on a dirty 5 V rail. Feed it from the ESP's 3.3 V pin and add the 10 µF capacitor in the schematic. |
| BH1750 lux module | I²C 0x23, 1–65535 lx, 3.3 V, pull-ups on board | Mount its window facing the room, not the ceiling. Cheap breakout, no gotcha. |
| AHT20 temp/RH module | I²C 0x38, ±2 % RH, 3.3 V | Reads 1–2 °C high inside the box next to the ESP. Fine for humidity, which is the point; use Wunda for room temperature. |
| ESP32-C3 Super Mini | RISC-V, WiFi + BLE 5, 11 usable GPIO, native USB-C, 3.3 V LDO rated 250 mA peak | The LDO cannot feed the radio at full 19.5 dBm transmit power; nodes drop off WiFi with “Auth expired”. Cap output_power at 8.5 dB in firmware (done in the common package). Some batches have a weak ceramic antenna; the fallback board is a WROOM-32 DevKit. |
Bill of materials
Two node types, one order. Quantities are editable; totals recompute. AliExpress prices include UK VAT at checkout and assume you buy the multipacks; Amazon UK prices are for next-day single units.
Per-node parts
| Part | Search term / spec | In A | In B | Unit £ | Qty | Line £ |
|---|---|---|---|---|---|---|
| ESP32-C3 Super Mini | “ESP32-C3 SuperMini” USB-C, with headers unsoldered | 1 | 1 | |||
| HLK-LD2450 radar | “HLK-LD2450 with cable”, latest firmware | 1 | – | |||
| HLK-LD2410C radar | “HLK-LD2410C with cable” | – | 1 | |||
| AM312 mini PIR | “AM312 PIR sensor module” | 1 | 1 | |||
| BH1750 lux module | “GY-302 BH1750” | 1 | 1 | |||
| AHT20 temp/humidity module | “AHT20 I2C module” | – | 1 | |||
| USB-C 5 V 1 A power adapter | Any UK-plug USB-A charger you own also works; “5V 1A USB charger UK” | 1 | 1 | |||
| USB-A to USB-C cable, 1.5 m | 24 AWG power cores; avoid the thinnest “data” leads | 1 | 1 | |||
| Capacitors 100 µF + 10 µF electrolytic | “100uF 16V electrolytic” assorted kit | 1 | 1 | |||
| Enclosure | 3D-printed (≈ 25 g PLA) or “ABS project box 60×36×25” | 1 | 1 | |||
| Mounting | Command strips or 2 × 3.5 mm screws + plugs | 1 | 1 | |||
| Hook-up wire, heat-shrink | Share of a reel of 26 AWG silicone wire, 7 colours | 1 | 1 | |||
| Type A node, each | ||||||
| Type B node, each | ||||||
| All nodes (with spares as Type A) | ||||||
One-off tools and consumables
| Item | Note | £ | Have it? |
|---|---|---|---|
| Soldering iron, 60 W temperature-controlled | Skip if you already own one | ||
| Lead-free solder 0.8 mm, flux pen | |||
| USB-C data cable for first flash | Must carry data; many charging leads do not | ||
| JST 1.25 mm crimp cables, 5-pin, 15 cm × 12 | Only if the radars did not ship with a cable | ||
| Header strips + Dupont wire | For bench-testing before soldering | ||
| 3D printer time | 11 × ~40 min, or a project box each from the list above | ||
| Tools you still need | |||
Order two spare ESP32-C3 boards and one spare of each radar; dead-on-arrival rates from the cheapest listings run about one in fifteen. Buy the radars in a listing that includes the 1.25 mm cable, or you'll be crimping. Ask for LD2450 firmware V2.02.23090617 or later in the listing; the ESPHome component needs it.
Node schematics
Both node types share one microcontroller pin map so a Type B is a Type A with a cheaper radar and one extra I²C part. Nothing here needs a custom PCB; every connection is a wire between module headers.
Pin map (both types)
| ESP32-C3 pin | Function | Goes to | Notes |
|---|---|---|---|
| 5V | USB 5 V rail | Radar 5V pin, 100 µF cap | Straight from USB-C, not through the LDO. Radar current never touches the 3.3 V regulator. |
| 3V3 | Regulated 3.3 V | PIR VCC, BH1750 VCC, AHT20 VCC, 10 µF cap | LDO peak 250 mA. Sensors total < 2 mA; the ESP radio is the only big load, hence the transmit-power cap. |
| GND | Common ground | Every module's GND | Star it at the ESP GND pin; do not daisy-chain through the radar. |
| GPIO4 | UART TX | Radar RX | 3.3 V logic. The radar's UART is 3.3 V tolerant despite the 5 V supply. |
| GPIO5 | UART RX | Radar TX | 256000 baud, 8N1. |
| GPIO6 | I²C SDA | BH1750 SDA, AHT20 SDA | Modules carry their own 4.7–10 kΩ pull-ups. Two modules in parallel is fine. |
| GPIO7 | I²C SCL | BH1750 SCL, AHT20 SCL | 100 kHz. |
| GPIO10 | Digital in | PIR OUT | AM312 drives it high at 3.3 V for ~2 s on motion. No pull needed. |
| GPIO8 | Status LED | On-board blue LED (active low) | Blinks while connecting, steady off once on WiFi. Inverted in firmware. |
| GPIO1 | Spare input | Radar OUT (LD2410C) or door reed switch | Internal pull-up in firmware if used for a reed switch. |
| GPIO3 | Spare ADC | Leak probe (utility) in Extras | 1 MΩ pull-up to 3.3 V, probe wires to ground. |
| GPIO0 / 20 / 21 | Spare | Second UART, buzzer, or future use | Leave unconnected. |
| GPIO2 · GPIO9 | Strapping pins | Nothing | GPIO9 is the BOOT button. Never wire sensors to these. |
Fallback board: ESP32 WROOM-32 DevKit (30-pin)
If a room turns out to have weak WiFi (porch, utility behind the boiler), swap the Super Mini for a WROOM-32 DevKit at £3.50. Better antenna, 1 A regulator, no transmit-power cap needed. Change only the board line and pin numbers in the firmware:
| Function | Super Mini | WROOM-32 DevKit |
|---|---|---|
| Radar TX / RX | GPIO4 / GPIO5 | GPIO17 / GPIO16 |
| I²C SDA / SCL | GPIO6 / GPIO7 | GPIO21 / GPIO22 |
| PIR | GPIO10 | GPIO27 |
| Status LED | GPIO8 inverted | GPIO2 |
| Spare input | GPIO1 | GPIO26 |
| Board | esp32-c3-devkitm-1 | esp32dev |
Power budget and supply
Everything runs at 5 V from a plug-in adapter. There is no mains work in this design, which keeps it inside what a homeowner may do without a Part P notification.
Current budget per node
| Load | Rail | Typical | Peak | Notes |
|---|---|---|---|---|
| ESP32-C3, WiFi on, power-save off | 3.3 V (LDO from 5 V) | 80 mA | 330 mA | Peaks are 1–2 ms transmit bursts. Capped at 8.5 dB they stay under the LDO's 250 mA rating most of the time; C2 covers the rest. |
| LD2450 (Type A) | 5 V | 150 mA | 200 mA | Continuous FMCW sweep; no sleep mode. |
| LD2410C (Type B) | 5 V | 80 mA | 120 mA | |
| AM312 PIR | 3.3 V | 0.05 mA | 0.1 mA | |
| BH1750 + AHT20 | 3.3 V | 0.4 mA | 1 mA | |
| Type A total at 5 V | ≈ 260 mA · 1.3 W | ≈ 600 mA | USB-C 1 A adapter: 40 % headroom at peak. | |
| Type B total at 5 V | ≈ 190 mA · 0.95 W | ≈ 500 mA |
Supply options
Protection and safety
- Over-current: the USB adapter's own current limit (typically 1.2–1.5 A) is the fuse. No additional fuse needed in Option 1.
- Isolation: all node electronics are SELV (< 60 V DC) behind a double-insulated adapter. Touch-safe; a plastic box is enough.
- Bathrooms: IET zones apply to mains, not to a 5 V node, but keep the adapter outside the bathroom. Run the USB lead through the wall or door frame from the landing socket, or put the adapter in the loft above the ceiling node. Never use a shaver socket adapter; they are current-limited transformers and brown out.
- Porch: IP-rated enclosure or a closed box under the soffit; adapter indoors, lead through the wall in a 6 mm hole sealed with silicone.
- Reverse polarity: impossible with USB-C; the radar cable is keyed.
- ESD: handle the LD2450 by the edges; its antenna side is bare and it is the most expensive part in the box.
Cable schedule
| Run | Cable | Length | Colour code |
|---|---|---|---|
| Adapter → node | USB-A to USB-C, 24 AWG power cores | ≤ 1.5 m (≤ 3 m if 22 AWG) | n/a |
| Radar → ESP | JST 1.25 mm 5-way pre-crimped (usually in the box) | 10–15 cm | red 5 V · black GND · yellow radar TX · green radar RX · white OUT |
| I²C modules → ESP | 26 AWG silicone hook-up | 5–8 cm | amber 3V3 · black GND · blue SDA · violet SCL |
| PIR → ESP | 26 AWG silicone hook-up | 5–8 cm | amber 3V3 · black GND · white OUT |
Wiring drawing and build order
The layout puts the radar at the front of the box with nothing in front of its antenna, the PIR lens through the front face, the lux window at the top edge, and the ESP at the back with its USB-C at the bottom.
Build order, per node
- Flash first, solder second.
Plug the bare ESP32-C3 into the PC, install the generic ESPHome firmware from web.esphome.io, get it on the WiFi. A board that will not take firmware goes back in the spares bag before you've soldered anything to it.
- Fit the capacitors.
C1 (100 µF) between 5V and GND pads, C2 (10 µF) between 3V3 and GND. Watch polarity: the stripe is negative. Bend them flat against the board.
- Radar cable.
Plug the JST lead into the radar. Cut the free ends to 8 cm, tin them, solder red → 5V, black → GND, yellow (radar TX) → GPIO5, green (radar RX) → GPIO4. Type B: white (OUT) → GPIO1.
- I²C modules.
BH1750: VCC → 3V3, GND → GND, SDA → GPIO6, SCL → GPIO7. Type B: AHT20 on the same four nets, wires twisted with the BH1750's. ADDR pin on the BH1750 left open (0x23).
- PIR.
AM312: VCC → 3V3, GND → GND, OUT → GPIO10. The middle pin is OUT on nearly all AM312 boards; check the silkscreen.
- Bench test on the desk.
Power from USB, OTA the real room config, watch the ESPHome log: I²C scan finds 0x23 (and 0x38), the radar firmware text sensor fills in, PIR toggles when you wave. Only now go near the enclosure.
- Box it.
Radar on the front with hot glue at the corners (never over the antenna), PIR lens through its hole, BH1750 at the top slot, ESP at the back with USB-C through the bottom cut-out. Loop the USB lead once inside as strain relief.
- Label it.
Room name and IP on the back with a label maker. Eleven identical boxes are not identical to Future You.
The box and where it goes on the wall
A single 3D-printed clamshell fits both node types. If you'd rather not print, a 90 × 60 × 28 mm ABS project box needs three holes and a slot.
The printed parts, in 3D
Six parts make the whole kit — the two-piece clamshell, two wall wedges, the bathroom corner bracket and the snap pegs. Drag to spin any of them, scroll to zoom, or just leave it turning. Every one is generated to exact size by parts.py and prints in PLA at 15 % infill.
Enclosure
Printed clamshell
Outer 92 × 62 × 28 mm, 2 mm walls, PLA or PETG. Front face: 12 mm PIR hole at top right, 4 mm lux slot on the top edge, six 1.5 mm vent slots on the bottom edge (Type B, for the humidity sensor). Back: two keyhole slots at 60 mm centres for screws, or a flat pad for Command strips. Four internal posts hold the radar 1 mm behind the front face; the ESP sits in a rear pocket with a 9 × 3.5 mm USB-C cut-out.
Off-the-shelf box
Any “60 × 36 × 25 project box” variant will not fit an LD2450 (it is 38 × 22 mm plus cable). Use the 90 × 60 × 28 mm size. Drill the 12 mm PIR hole, a 4 mm lux hole, and file a USB-C notch. Hot-glue the radar to the inside front.
Tilt bracket
A 15° wedge printed as a separate part for wall mounts at 1.9 m; bathrooms use a corner bracket that aims the box 45° across the room from the ceiling corner. Both print as separate parts, generated by parts.py — spin them in the viewer above, or see the full printable set — sizes, filament and print settings — just below.
Printable parts
Six STLs, generated by parts.py with the same manifold3d stack as the NoteCase, exported already in print orientation. Everything is in C:\envy\presence\stl\; the previews below are rendered straight from the geometry that was exported. Change a dimension in the parameter block at the top of the script and rerun it to get a new set with the geometric checks re-run.


| File | What it is | Size mm | Filament | Print on | Ender time |
|---|---|---|---|---|---|
| enclosure-base.stl | Back half. Keyholes at 60 mm centres (entry circle at the bottom, slot up), ESP32-C3 rails and top stop, USB-C cut-out, lux slot in the top wall, six vent slots, snap groove. | 92 × 62 × 20 | ≈ 26 g | back plate down | 1 h 20 |
| enclosure-lid.stl | Front half. 12 mm radar pocket frame with a gap for the JST lead, 9.8 mm PIR dome hole with a board frame behind it, 5 mm lip with a 0.4 mm snap rib. Fits the base with 0.2 mm clearance. | 92 × 62 × 13 | ≈ 21 g | front face down | 1 h 10 |
| wedge-15.stl | Standard wall mount at 1.8–2.0 m. Peg holes on the sloped face at 60 mm centres, two countersunk holes for 3.5 mm wall screws. Flat back for Command strips. | 84 × 54 × 17 | ≈ 30 g | wall face down | 1 h 00 |
| wedge-25.stl | Same wedge for a higher mount or a small room where the beam has to reach the floor sooner. | 84 × 54 × 28 | ≈ 40 g | wall face down | 1 h 25 |
| corner-bracket.stl | Bathrooms. Sits in the wall-wall corner under the ceiling, presents a face at 45° to both walls tilted 25° down. Hollow with vertical ribs, two wall screws at 50 mm from the corner with 7.8 mm counterbores, optional ceiling screw through the centre column. Box corners clear both walls by 1.5 mm and the ceiling by 3 mm. | 107 × 107 × 50 | ≈ 70 g | ceiling face down | 3 h 10 |
| peg.stl | Hanging peg for the wedge and bracket: 6.6 mm head, 3.4 mm shank, press-fit tail into the 3.6 mm holes with a drop of superglue. Or use M3 × 12 screws with nuts in the wedge instead. | 7 × 7 × 11 | ≈ 0.2 g | head down | 10 min (×4) |
Print settings
- 0.2 mm layers, 3 walls, 15 % infill, no supports for every part. The bracket's sloped face is a 25° overhang and prints clean; the snap rib on the lid is a 0.4 mm overhang and needs no help.
- PLA indoors, PETG for the porch node and the bathroom brackets (steam and summer sun both soften PLA).
- Test the snap on the first pair: the lip is 0.2 mm smaller than the base opening per side and the rib sits 0.1 mm inside its groove. If your printer runs tight, scale the lid 100.3 % in X and Y; if loose, 99.7 %.
- Peg holes are 3.6 mm and print at about 3.4, which is the peg diameter: push in with a drop of superglue. If a peg won't go, run a 3.5 mm drill through the hole.
How the parts go together
- Flat wall at 1.9 m: two 3.5 mm screws 60 mm apart, heads 3 mm proud. Lower the base onto them. No wedge.
- Wall with tilt: screw the wedge to the wall (or stick it with two Command strips), press two pegs into its face, lower the base onto the pegs.
- Bathroom ceiling corner: hold the bracket in the corner against the ceiling, mark and drill the two wall holes 50 mm from the corner and 40 mm below the ceiling, screw it in, pegs, hang the base. The face already points 45° across the room and 25° down.
- Wire, test, then press the lid on until it clicks. It comes off with a fingernail at the USB-C notch.
Room-by-room mounting notes
| Room | Height | Aim | Avoid |
|---|---|---|---|
| Porch | Soffit, 2.2 m | 20° down at the doormat | Street; cap LD2410 gates to 3 (≈ 2.25 m). Rain does not trigger radar; a swinging hanging basket does. |
| Hallway | 1.9 m | Along the hall from the far end | Straight at the front door glass (radar reflects off metal door furniture; PIR sees low sun). |
| Living room | 1.9 m | From the wall opposite the sofa | Facing the window with curtains; facing the kitchen doorway. |
| Kitchen | 2.1 m, high corner | Diagonally across the worktops | Extractor hood, fridge front (metal), the hob's rising heat for the PIR. |
| Utility | 1.8 m | At the door from beside the machines | Any line to the drum. Set max still gate low. |
| Landing | 1.9 m end wall | Along the landing to the stair head | Facing bedroom doors (bleeds into bedrooms). Zone 1 tightly on the top two stairs. |
| Bedrooms | 1.8–1.9 m | Across the bed at pillow height | Fans, wardrobe mirror doors, a TV on an arm. |
| Bathrooms | Ceiling corner, 2.2 m | 45° across, toward the door and basin | Inside the shower zone; facing the extractor. Steam is invisible to radar; a towel on a warm rail is not to a PIR, so PIR only confirms entry here. |
ESPHome configuration
Three shared files and one eleven-line file per room. The room file only carries substitutions, so a firmware fix is one edit and eleven OTA pushes.
Files on the Pi
| Path (all in /home/decs/esphome) | Purpose |
|---|---|
| secrets.yaml | WiFi, API key, OTA and fallback-AP passwords. Already exists for the alarm bridge; add the new keys. |
| presence-common.yaml | Board, WiFi, API, pins, PIR, lux, fusion, diagnostics. Shared by every node. |
| presence-ld2450.yaml | Type A radar: targets, zones, timeouts. |
| presence-ld2410.yaml | Type B radar plus the AHT20 humidity sensor. |
| presence-<room>.yaml × 11 | Substitutions only. Generated below. |
Room file generator
secrets.yaml (add these keys)
presence-common.yaml
presence-ld2450.yaml (Type A)
presence-ld2410.yaml (Type B)
Build and flash workflow on the Pi
Eleven nodes deserve the ESPHome dashboard rather than one-off docker run lines. It is the same image you already use for the alarm bridge, left running on port 6052 with the host network so it can reach 192.168.5.x. It idles at about 100 MB; compiles are the only heavy moment, so do them one at a time and not during a TRADEPIT cron.
- First flash over USB from the Envy PC.
Open web.esphome.io in Chrome, plug the bare ESP32-C3 in, choose “Prepare for first use”, then “Connect to Wi-Fi” and pick the mesh SSID. The board gets a DHCP address on 192.168.5.x and shows up in the dashboard's discovered list within a minute.
- Adopt it with the right room file.
In the dashboard, open the room's card, Install → Wirelessly, and pick the discovered address. The node reboots onto its static IP with the real firmware. From here on every update is one click.
- Watch the first log.
Logs → the I²C scan lists 0x23 (and 0x38 on Type B), the radar firmware text sensor fills in, and PIR flips when you wave. Any one missing is a wiring fault, and you have not put the lid on yet.
- Add to Home Assistant.
Settings → Devices & services: ESPHome discovers each node on the Pi's wlan0. If discovery is slow, Add integration → ESPHome → host = the static IP, port 6053, paste the API key.
The OTA password must match on both sides after the first install; a fresh web.esphome.io board has none, which is why the first push works. And the Super Mini logs over native USB only when hardware_uart: USB_SERIAL_JTAG is set, as it is here; without it you get a blank log and assume the board is dead.
Integration, house logic and automations
Everything below lives in one package file so it can be dropped in, backed up and removed as a unit. Entity names follow from the friendly names in the room files, so nothing needs renaming.
Entities each node creates
| Entity (living room shown) | Type | Use |
|---|---|---|
| binary_sensor.living_room_presence_occupancy | A + B | The one automations use. Fused, held. |
| binary_sensor.living_room_presence_pir | A + B | Raw PIR, for tuning and “entered just now”. |
| binary_sensor.living_room_presence_radar_target / _radar_moving / _radar_still | A + B | Raw radar states. |
| sensor.living_room_presence_illuminance | A + B | Lux for “is it dark”. |
| sensor.living_room_presence_target_count | A | How many people the radar sees (0–3). |
| sensor.living_room_presence_target_1_x / _y / _speed / _distance | A | Live position in mm, for the map card and zone templates. |
| sensor.living_room_presence_zone_1_count / _still_count | A | People in the sofa or bed zone. Still count in the bed zone is “asleep”. |
| number.living_room_presence_zone_1_x1 … y2 | A | Zone corners, editable from the UI. |
| sensor.bathroom_1_presence_humidity / _temperature | B | Fan control. |
| number.*_radar_timeout, switch.*_radar_bluetooth … | A + B | Tuning knobs; diagnostic category so they stay out of the way. |
Enable packages once
The presence package
Fill in the four placeholders marked TODO: light entity ids, the two fan switches, the Wunda climate entities and your phone's notify service. Everything else is ready. Check with Developer tools → YAML → Check configuration, then reload.
Notes on the logic
- Living room and bedrooms never switch on automatically. People choose their own lighting there; presence only turns it off after a long vacancy. The transit rooms, kitchen, utility, bathrooms and porch are fully automatic.
- Disarm is never automatic. Part-arm at night is the only alarm action, and it can be cancelled from the phone. The intruder automation only notifies; the panel remains the authority.
- Heating setback snapshots the setpoint so it restores to exactly where Wunda's schedule had it, and clears the snapshot so a schedule change later is not overwritten.
- Everyone Asleep uses moving-target counts, not just occupancy: a person reading in bed is “occupied, still”. Ten minutes of still plus an empty downstairs after ten at night is a good enough definition for arming.
- Porch is excluded from House Occupied so a courier does not count as someone home.
A Presence tab for home-panel
One tile per room that glows when occupied, a house summary row, the four control toggles, and a live radar map card for any Type A room. The map is a tiny custom card, registered the same way as the swipe-gesture module already on the panel.
Live radar map card
Draws the sensor at the bottom centre, its ±60° field of view, a 1 m grid, the three zones from the node's number entities, and each tracked target as a dot with its distance. Copy to /config/www/presence-map.js and register it as a module resource next to panel-gestures.js.
The view
Add ("presence","Presence","mdi:motion-sensor") to the TABS list in the panel builder and append this view to the tabs source. Tiles use custom:button-card, already installed on the panel; swap the styles for the decs_tile template if you want them to match exactly.
Add /local/presence-map.js?v=1 as a JavaScript module in .storage/lovelace_resources the way panel-gestures.js was added, then hard-reload Fully Kiosk. Bump ?v= whenever you edit the file so the tablet stops using its cached copy.
Bring-up, tuning and acceptance tests
Do one room end-to-end before building the other ten. The living room is the best first room: big, a sofa to sit still on, and you'll notice immediately if it is wrong.
Order of work
- Pi side, once.
ESPHome dashboard container up, secrets in place, the four shared files and the eleven room files copied in. Reserve 192.168.5.130–140 on the Tenda for the nodes' MACs as they appear; the static IPs in firmware keep working even before you do.
- Living room node on the bench.
Flash, adopt, watch the log, add to HA. Confirm the entities from the Home Assistant section exist and Occupancy follows you.
- Mount and aim.
Command strips first; screws once you're happy. Aim per the mounting table. Sit on the sofa, watch Target 1 X/Y for a minute: numbers steady and non-zero means the radar has you still.
- Draw the zones.
Stand at each corner of the sofa, note X and Y, add 300 mm margin, type the four numbers into the Zone 1 X1/Y1/X2/Y2 numbers. Watch Zone 1 Count go to 1 when you sit. Repeat for zone 2. Leave Zone Type at Disabled: zone counts are computed on the node and work regardless.
- Only if something moves in the beam, use Filter.
Set Zone Type to Filter and draw the moving object (curtain, fan) as a zone. In Filter mode all three zones exclude, so bed and sofa counting then has to be done in HA from Target X/Y with a template. Prefer moving the node.
- Set the hold.
Default 120 s in living/bedrooms, 60 s kitchen/bathrooms, 30 s hall/landing. Raise it if lights ever drop while you are sitting still; lower it if a room stays occupied long after you left.
- Radar housekeeping.
Multi Target on. Radar Timeout 5 s. Radar Bluetooth off. Type B: Engineering Mode on, walk the room, read the gate energies, set each gate's move/still threshold 10–15 above its empty-room energy, Max Move/Still Gate to the room's depth, Engineering Mode off.
- Acceptance tests, then the next room.
Run the five tests below, log the results in the table on the wall of the room in your head, and only then solder node number two.
Acceptance tests per room
| Test | Pass | If it fails |
|---|---|---|
| Walk in from the door | Occupancy on within 1 s (PIR) | PIR aimed wrong or warm-up not finished (60 s after power). |
| Sit still 10 minutes | Occupancy stays on; Radar Still on | Still threshold too high on that gate (Type B) or you're outside the cone. Move node or lower still threshold. |
| Leave, close the door | Occupancy off within hold + 10 s | Something moving in the beam, or the node sees the next room. Filter zone or re-aim. |
| Empty room overnight | Zero “on” events between 01:00 and 06:00 in History | Fan, radiator actuator, curtain, or pet. Check Target X/Y where the phantom appears. |
| Wave through the open doorway from outside | No trigger, or a trigger that clears within the hold | Aim the node so the doorway is at the edge of the cone, not the centre. |
Checklist before calling a room done
- Label on the back with room and IP; Tenda reservation made.
- ESPHome device shows “online” in the dashboard and HA; WiFi signal better than −75 dBm.
- Zones drawn and named in the entity registry (rename Zone 1 Count → “Sofa count” etc. in HA, not in YAML).
- Hold set; automations for that room un-commented in the package.
- Lux calibration: cover the sensor and check it reads < 5, then shine a phone torch and see it jump. Set the dark threshold by reading the lux at the moment you'd normally reach for the switch.
When it misbehaves
Ordered by how often it actually happens.
| Symptom | Likely cause | Fix |
|---|---|---|
| Node drops off WiFi every few hours; log says “Auth expired” or “4-way handshake timeout” | Super Mini's LDO browning out on transmit bursts | Confirm output_power: 8.5dB compiled in; add C2 if missing; try a different USB cable and adapter. Persistent: swap the board for a WROOM-32 DevKit. |
| Node online but 2.4 GHz is noisy; other devices also drop | Channel collision between the Virgin hub and the mesh (already seen with the alarm ESP) | Keep the Virgin hub on channel 1 and the mesh on 6 or 11; check with a WiFi analyser app. Nodes should see at least −75 dBm. |
| Occupancy stuck on in an empty room | Something moving in the beam, or bleed through a stud wall | Watch Target 1 X/Y to locate the phantom; re-aim or add a Filter zone. Type B: lower Max Still Gate. Check Radar Timeout is 5 s not 60. |
| Occupancy drops while sitting still | Hold too short, or the still target falls below threshold | Raise hold in the room file. Type B: lower the still threshold on the gate you sit in (engineering mode shows the energy). |
| PIR always on, or triggers with nobody there | Warm-up (first 60 s), a radiator or sun in its view, or supply noise | Wait; re-aim; confirm the PIR is fed from 3V3 with C2 fitted. Cheap clone that won't settle: replace, they're 70p. |
| Radar entities “unavailable”, firmware text sensor blank | UART wiring crossed or baud mismatch | Yellow (radar TX) must land on GPIO5, green (radar RX) on GPIO4. Baud 256000. If the module was ever set to another baud by a phone app, factory-reset it. |
| I²C scan shows nothing | SDA/SCL swapped or a dry joint | Blue on GPIO6, violet on GPIO7. Re-flow. Modules carry pull-ups; if you've fitted a bare BH1750 chip you need 4.7 kΩ to 3V3 on both lines. |
| ESPHome dashboard cannot reach 192.168.5.x | Container started without host networking | Recreate with --network host. The Pi's wlan0 on 192.168.5.126 is the only route into the mesh. |
| HA shows the device but entities are unavailable after an update | API key mismatch or the node rebooted onto a different IP | Nodes use static IPs, so check the Tenda hasn't handed the same address to something else. Re-enter the key in the integration if you regenerated it. |
| LD2450 works on the bench, nothing once boxed | Metal or foil in front of the antenna, or the radar face pressed against a thick wall | 2 mm plastic front, nothing metallic, 10 mm air gap. |
| Bathroom node reads 85 % humidity all day | AHT20 sealed in the box with no airflow | Vent slots on the bottom edge of the enclosure, sensor near them. |
| Empty log on USB after flashing | Logger not on native USB | hardware_uart: USB_SERIAL_JTAG in the common package; it is already there, so check you actually compiled with the package. |
| history_stats sensor shows 24.0 h | A room stuck occupied for a whole day | That sensor exists for this reason. Go and find the fan. |
Diagnostics you already have
- ESPHome dashboard → Logs streams the node live over the API, no USB needed.
- HA History for the raw PIR and Radar entities beside Occupancy shows which sensor held a room on.
- WiFi Signal and Uptime on every node; a sawtooth uptime is a rebooting board.
- The OUT pin binary sensor on Type B tells you whether the radar itself thinks someone is there, independent of the UART parsing.
What I would add next, and why
Separate from the core design on purpose. Each of these is optional, cheap, and builds on the nodes rather than replacing them. The first three are the ones I'd actually do.
Built on the presence nodes
1 · “Who is where” with the phones you carry
£0 · one line of YAML per node
Every node can also be a Bluetooth proxy. Turn on the Home Assistant companion app's BLE transmitter on Kev's and Linda's phones, and the Private BLE Device integration (or the Bermuda HACS integration for room-level trilateration) tells HA which node hears each phone loudest. Combined with the room occupancy you get “Linda in the living room”, which the radar alone can never give. Add to the common package:
Cost is RAM and a little WiFi throughput; the C3 copes with the LD2410 comfortably and with the LD2450 with headroom to spare in testing. Start with the four Type B nodes plus the landing and hall.
2 · Front door contact on the hall node
£0.50 · reed switch to GPIO1 with the internal pull-up
“Door opened while the house is empty” and “door opened while armed” become instant, and the arrival scene fires on the door rather than on the first footstep. A second reed on the porch node covers the back door if it is near enough.
3 · Leak probe on the utility node
£0 · two stainless wires to GPIO3 with a 1 MΩ pull-up
Lay the wires on the floor behind the washing machine. Water between them pulls GPIO3 low: an ESPHome binary sensor, an HA alert, and a Tuya plug that kills the machine. The same trick under each basin from the bathroom nodes.
4 · Bed occupancy without radar
£4 · HX711 + four 50 kg load cells under the bed feet
Radar still-in-zone is good; weight on the bed is certain, and it distinguishes a person from a duvet the cat has climbed under. Wire to the bedroom node's spare UART pins. Only worth it if Everyone Asleep proves flaky.
5 · CO₂ in the bedrooms
£12 each · Sensirion SCD40 on the I²C bus
CO₂ rising overnight is both an air-quality problem and the strongest corroboration of “someone is asleep in here” that exists. Automate a window-open reminder or the extractor. Same bus, one more line of YAML.
6 · Porch: person or parcel
£0 · logic only
Porch occupancy that clears within 20 s and coincides with a Ring motion event is a delivery; occupancy that stays is a visitor. Keep a “parcel probably on the step” flag until the door next opens. If false alarms annoy you, a £40 MLX90640 thermal array on the porch node tells a warm person from a cold box outright.
Home Assistant project, more broadly
UPS for the Pi
The alarm, heating, presence and the wall panel all now depend on DECS. A 15 W USB-C UPS (£25) or a UPS HAT keeps it up through a trip of the breaker and gives HA a clean shutdown signal. This is the single most valuable £25 in the whole project.
Nightly backups off the Pi
A cron that tars /home/decs/homeassistant/config and /home/decs/esphome to the ASUS server at 192.168.0.186 over SMB or rsync, keeping 14 days. The SSD will fail eventually; the config is months of work.
A Zigbee coordinator, later
SLZB-06 (£35, PoE or USB, sits on the network so the Pi's USB stays free). It opens up £4 door contacts, £8 leak sensors, smoke/CO alarms that report to HA, and cheap TRVs if Wunda ever needs help. Not needed for presence; noted because every extra above has a Zigbee shortcut too.
Occupancy-aware energy
With the Victron data already in HA: when the house is empty and the battery is above 80 %, run the immersion or the dishwasher plug on surplus. When Everyone Asleep goes on, drop TV and AV standby plugs. Presence turns the energy dashboard from a display into a control.
Voice, when it arrives
The Speech-to-Phrase plan in the notes pairs naturally with presence: a satellite only needs to listen in the occupied room, and “turn off the lights” with no room name can mean “the room I'm in”. Presence supplies the missing noun.
Occupancy history heat-map
The history_stats sensors feed a simple ApexCharts heat-map on the panel: rooms down the side, hours across, colour for occupied. Two weeks of it tells you which rooms Wunda is heating for nobody. Free insight.
Guest mode and holiday mode
Guest mode is already in the package. Holiday mode is the inverse: when the house has been empty 24 h, replay last week's living-room and bedroom lighting pattern from history_stats so the house looks lived in, and raise the intruder notification to critical.
Write the node firmware to git
The Pi's /home/decs/esphome and /config/packages in a private GitHub repo, pushed by the backup cron. The Anchor project already reads GitHub, so the design and the live config stay in one place.
Suggested order
- Living room node end-to-end (this pack, sections 6–13).
- Remaining ten nodes, two or three an evening.
- UPS and backups, same week.
- Bluetooth proxies and phone BLE, one evening.
- Door contact and leak probes while the nodes are still fresh in your hands.
- Heat-map and energy automations once there are two weeks of history to look at.
The same node, six upgrades layered on top
Everything here builds on the Rev A/B pack above: same ESP32-C3, same pin map, same room files, same Home Assistant package. Nothing already built has to change. Two additions are firmware only, two are optional hardware for specific rooms, one is a set-up tool, one is a Bluetooth switch-on.
| Addition | Type | Where | Cost | What it changes |
|---|---|---|---|---|
| Ten editable zones + polygons | Firmware | Every Type A node | £0 | 3 zones → 10 rectangles live-editable from HA, plus YAML polygons for wedges and doorway notches |
| Fan / curtain rejection | Firmware | Every Type A node | £0 | A target that "moves" but never goes anywhere is ignored after 60 s |
| Map editor v2 | Dashboard | Wall panel | £0 | Drag zones on the live radar view; polygons and a scanned floor plan drawn behind |
| Type A+ (LD6001, 60 GHz) | Hardware | Living room, kitchen | £20 ea | 8 tracked people, 8 m, ±60° / ±30°, less bleed through walls; new lid pocket |
| Bluetooth proxy + Bermuda | FW + HACS | All nodes | £0 | "Linda is in the living room" from the phones you carry |
| Quest 3 room scan | Tool | Setup only | £0 | Zones and a floor plan from the headset's Space Setup, in the radar's own frame |
| Type C vision (Grove Vision AI V2) | Hardware | Hall, landing, living, kitchen, porch | £18 ea | Dog / cat / person classification on the node, nothing leaves it |
How the versions stack
Rev A/B — the built pack
One mmWave + PIR + lux node per room, fused on the ESP, three module zones, radar + PIR + hold for a still sleeper. Everything in sections 1–15 above.
Rev C — this layer
Ten editable zones with automatic fan rejection, a drag-to-edit map, optional 60 GHz for the two busy rooms, Bluetooth "who", a Quest 3 scan tool, and optional on-device dog-vs-person vision. Each is independent — take the ones you want.
Order of work
- Firmware first: ten zones, fan rejection, Bluetooth proxy. One OTA per node from the dashboard, nothing to buy.
- Map editor v2 on the panel, so the zones can be drawn rather than typed.
- Quest scan once the map exists, because that is what it feeds.
- Type A+ modules for the two big rooms when the LD6001s arrive.
- Type C vision last, and only in the five rooms where dog-versus-person changes an outcome.
Rev C needs ids on the target sensors and a filtered radar signal in the fusion — both shown under "Ten zones" below. Everything else is a new package file included from the room file.
How it stacks up against a Shelly — and the 60 GHz option
The Shelly Presence Gen4 is the obvious shop-bought comparison: a 60 GHz radar with app-drawn zones at about £65 a room. The HLK-LD6001 is the module it is built around, and Rev C can drop it into the two rooms that ever hold a crowd — while every other room stays on the £6 24 GHz module.
| Shelly Presence Gen4 | Rev A/B node | Rev C node | |
|---|---|---|---|
| Radar | 60 GHz | 24 GHz | 24 GHz, or 60 GHz where it counts |
| Targets | 6 | 3 | 3, or 8 (Type A+) |
| Zones | 10 | 3 | 10 editable + polygons |
| Fan / curtain handling | Sensitivity filters | Filter zone | Automatic rejection |
| Still person | To 3 m | Radar + PIR + hold | Same |
| Who is it | No | No | Yes — Bluetooth + phones |
| Dog vs person | Pet filter (size) | No | Yes (Type C), classified |
| Zone setup | App | Typed numbers | Drag on the panel, or Quest scan |
| Floor plan on the panel | Blank grid in the app | Grid | Scanned room outline + furniture |
| Lux / humidity | 3 states / none | Real lux / RH in wet rooms | Same |
| Data | Cloud account option | Local only | Local only |
| Price per room | ≈ £65 | £13–15 | £15 · £35 A+ · £33 C |
| LD2450 (Type A) | LD6001 (Type A+) | |
|---|---|---|
| Band / antenna | 24 GHz, 1T2R | 60 GHz, 4T3R |
| Targets | 3 | 8 |
| Range / FOV | 6 m, ±60° | 8 m, ±60° H, ±30° V |
| Mount | 1.8–2.0 m, 10° down | 2.2 m wall, 10° down |
| Power | ≤ 200 mA | 1.1 W avg (≈ 220 mA) |
| Board | 38 × 22 mm | 60 × 30 mm |
| UART | 256000 | 115200 |
| Wall bleed | Sees through plasterboard | Mostly stopped by plasterboard |
| Price | £6 | ≈ £26 |
Rev C parts
| Item | Qty | £ | Note |
|---|---|---|---|
| HLK-LD6001 60 GHz module | 2 | 52 | Living room, kitchen. Print enclosure-lid-ld6001.stl for each. |
| Grove Vision AI V2 | 5 | 65 | Hall, landing, living, kitchen, porch. |
| OV5647 NoIR camera module | 5 | 20 | Pi-camera type, swaps onto the Grove board. |
| IR LED 940 nm + BC337 + 47 Ω | 5 sets | 3 | Night illumination. |
| Slide switch + 3 mm LED | 5 | 2 | Camera power + indicator. |
| ESP32-S3 Super Mini (contingency) | 2 | 6 | Only if a node runs short of RAM with the proxy on. |
| Total | ≈ 148 | Whole Rev C hardware. Firmware, map editor, scan tool and Bluetooth cost nothing. |
presence-ld6001.yaml (Type A+ radar package)
Drop-in for presence-ld2450.yaml in the room file. The module's own four zones are exposed too; the ten-rectangle package sits on top exactly as with the LD2450 because it only reads target coordinates. The LD6001 reports no per-target speed, so the fan test uses position change alone.
The component's option names are taken from its shipped LD6001A example; the plain LD6001 shares them except where the README marks a difference. Check the sign of X against the map card: if a person walking to your right moves left on the map, mirror it in the card. Both are five-minute checks, not design risks.
Lid variant
enclosure-lid-ld6001.stl is generated with python parts.py --ld6001: the radar pocket grows to 60.6 × 30.6 mm and moves to the lower left so the PIR frame stays put. Base, wedges, bracket and pegs are unchanged. Print it in place of the standard lid for the living room and kitchen nodes.
Ten editable zones, drawn on the panel, fans ignored
The LD2450's three-zone limit is only its own on-module region filter. Zone counting already happens on the ESP from target coordinates, so Rev C adds ten rectangles held in number entities, evaluated twice a second, plus a fan-rejection test, plus an optional polygon layer for the rooms a rectangle cannot follow.
How it works
- Each zone is four numbers (x1, y1, x2, y2 in mm, radar frame) stored on the node and restored across reboots. All four equal means "undefined" and it reports nothing. Edit them from HA, the map editor, or the Quest scan.
- Every 500 ms the node reads the three targets, drops any the fan test has rejected, and publishes a count and an occupancy sensor per zone. Occupancy holds 5 s so a target flickering on a boundary doesn't chatter.
- Fan rejection: a target whose speed stays non-zero while its position stays within 300 mm of where it first appeared, for 60 s, is a fan, a curtain, a plant by a radiator — excluded until it actually travels. A sleeper is not caught: their speed reads zero.
- Polygons (optional) use the TillFleisch external component for convex polygon zones written in YAML — the stair-head wedge, a seating area with the doorway cut out. The ten-rectangle layer still works on top because it only reads target coordinates.
presence-zones10.yaml creates, per node: number.<node>_zone_1..10_{x1,y1,x2,y2} (config), sensor.<node>_zone_1..10_count, binary_sensor.<node>_zone_1..10_occupancy, a Rejected Targets diagnostic, and a filtered Radar Target Filtered that the fusion uses instead of the raw radar. Include it after the radar package; it replaces nothing.
Edits to the existing Rev A files
Map editor v2
The Rev A map card becomes an editor. Drag on empty space to create a zone in the first free slot, drag a corner to resize, drag the middle to move. Each change writes the four numbers to the node through Home Assistant, so it is live before you let go. Polygons and a scanned room outline draw underneath as read-only guides. To delete a zone, drag it down to nothing or set its four numbers equal.
The full presence-map.js v2 (drag logic, polygon and backdrop rendering) and the generated presence-zones10.yaml live in the Pi's /config/www and /home/decs/esphome — bump ?v=2 in the Lovelace resource when you replace v1.
Eleven Bluetooth ears, and the phones you carry
Every node's ESP32-C3 has Bluetooth 5. Switching on the proxy makes the house a BLE receiver grid; Bermuda in Home Assistant turns "which node hears this phone loudest" into "Linda is in the living room". This is the one thing no radar can do, and it costs nothing.
Set-up in Home Assistant
- Install Bermuda from HACS and add the integration. It finds the ESPHome proxies by itself.
- Put the nodes in Areas. Settings → Devices: assign each presence node to its room. Bermuda reports the Area of the loudest proxy, so this mapping is the whole calibration.
- Phones. Companion app → Sensors → BLE Transmitter: enable, set to iBeacon, note the UUID. Add it in Bermuda. Android randomises the MAC; the beacon UUID is what Bermuda follows.
- Anything else. A £3 BLE tag on a key ring, a Xiaomi thermometer, a watch: each becomes a device with an Area.
- Combine with the radar. The template below names someone only when the radar also sees a person in that room, which removes the BLE wobble at boundaries.
An LD2450, the ten-zone package and a passive proxy fit on the C3 with the esp-idf framework. If a node logs heap warnings after adding the proxy, move that room to an ESP32-S3 Super Mini (£3, same footprint, 8 MB PSRAM): radar TX/RX GPIO5/GPIO4 become GPIO2/GPIO3, I²C and PIR stay.
Zones and a floor plan from the headset
After Space Setup, the Quest holds each room as labelled geometry: a floor outline, walls, and furniture as boxes tagged bed, couch, table, storage, door, window. The Meta Quest Browser hands that to a WebXR page served from the Pi; you point the controller at the sensor on the wall to fix the radar frame, and the zones are written to the node and the outline drawn behind the live radar map.
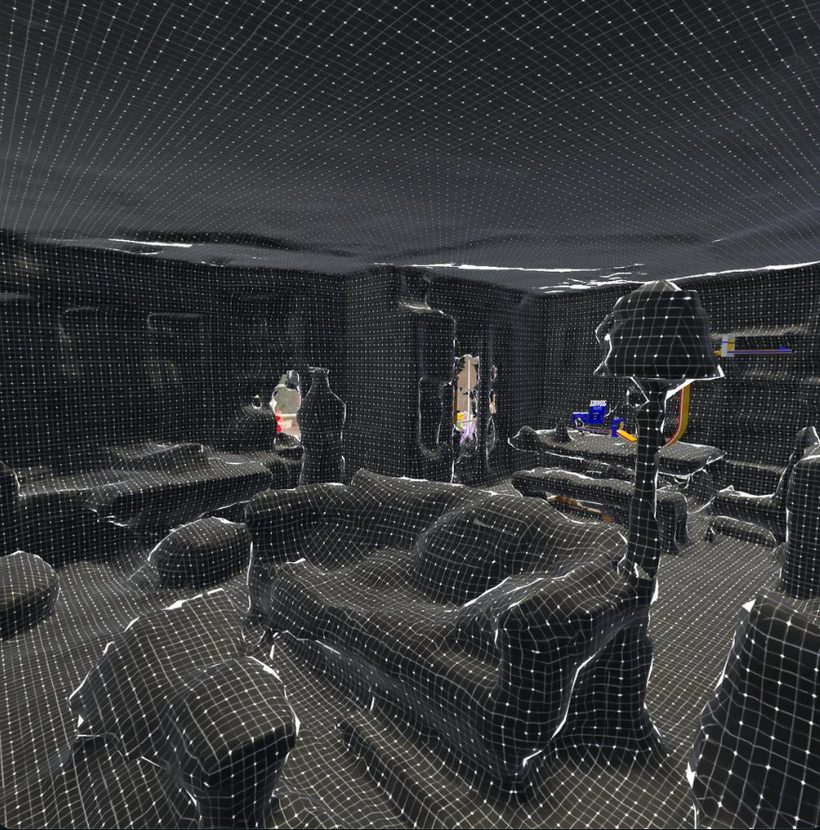
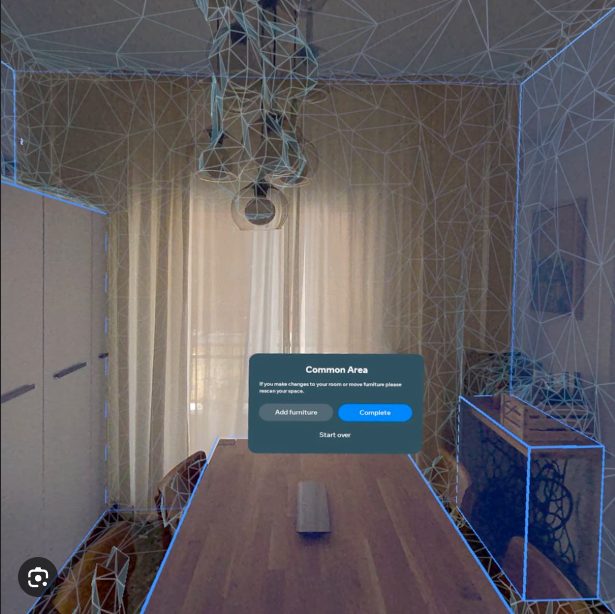
Doing a room
- Space Setup on the headset for that room, marking the bed or sofa, tables, doors and windows. Five minutes.
- Open
https://192.168.0.111:8443/roomscan.htmlin the Quest Browser, accept the certificate once, pick the room, enter AR. - Point the controller at the node on the wall and pull the trigger. The page reports the hit height; it should match the mounting height.
- Send. The zones appear on the node's number entities within a second and the map card shows the room outline behind the live dots.
- Tidy on the map. A scanned couch zone is its footprint plus 300 mm; drag an edge in if the radar picks people up in the walkway beside it.
The Pi handler
The WebXR page (roomscan.html) does the geometry in the headset; this small HTTPS server on the Pi receives the scan, writes the zone numbers through the HA REST API and saves a backdrop file for the map card.
Space Setup gives boxes and planes, not shapes; a curved sofa is its bounding box. Coordinates are only useful once the node is marked, so a scan without that step is just a picture. If mesh-detection is refused by the headset, planes alone are enough for everything here.
A module that says "dog", and never says anything else
The Grove Vision AI V2 runs its own person, dog and cat detector on a Himax WiseEye2 at 0.4 W and reports class, box and confidence over a serial line. No video leaves it, it has no radio, and the ESP32-C3 stays as it is. Clip it onto an existing node or build a room with it from the start; the firmware is the same either way.
What it adds and what it does not
| Question | Without vision | With vision |
|---|---|---|
| Is something in the room? | Radar + PIR, as now | Same. The camera does not change occupancy. |
| Is it a person? | Assumed | person_confirmed: radar target plus a person class in the last 5 s. The alarm and stair automations require it. |
| Is it the dog? | Radar cannot tell | Dog-only for 30 s suppresses the room's occupancy. |
| In the dark | n/a | Two 940 nm IR LEDs on a GPIO, switched on when lux is low. About 4 m on a hall or landing. |
Where it goes
Hall, landing, living room, kitchen, porch. Never bedrooms or bathrooms: radar and PIR already handle a still sleeper, and a lens there buys nothing. The porch module needs the outdoor-rated enclosure and faces the doormat, not the street.
presence-vision.yaml
Print the first few JSON lines from the module to the log before trusting the parser: the box field order in the SSCMA protocol is x, y, w, h, score, target. If the log shows scores above 100, the order on your firmware differs and the two indices in the lambda swap. Five minutes, once.
Home Assistant fusion
Privacy, written down
- Inference on the module; only class, box and score cross the serial line. No frames are stored or sent, and the module has no radio.
- A visible LED lights whenever the module is powered, and a slide switch on the box cuts its 5 V. Off means blind, and the node keeps working without it.
- Not in bedrooms or bathrooms, by design rather than by setting.